 In November of 2014 I had the opportunity to attend a week-long spray application technology seminar at Cornell University taught by Andrew Landers. Andrew is well known in the industry as a spray technology guru and has come to the Lodi area to spread his knowledge on multiple occasions. A week-long training hardly makes me an expert, but I did come away with a new appreciation for application technology as well as a desire to help growers improve their application efficiency and accuracy. As I am a Lodi PCA, I have a familiarity with the Lodi Grape growing region and have tailored these articles to be helpful to Lodi grape growers of all experience levels. I want to address two very basic aspects of spraying: “Wind” and “Water”. This article will be on the air generated to move the spray into the canopy and the following will be on the liquid being formed into droplets and propelled at the canopy.
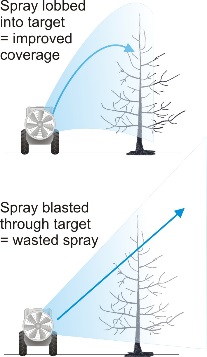
Figure 1: Decreasing air speed leads to greater deposition Photo used with permission from Jason Deveau at www.sprayers101.com.
________________________________________________
According to a recent Lodi Winegrape Commission (LWC) grower survey, 62% of the 138 respondents reported that the airblast sprayer (with or without towers) made up the majority of their fleet. With this in mind, these articles will focus on the airblast sprayer (axial fan design), but the principals are easily translated to other sprayer designs.
________________________________________________
Common Misconception: Large volumes of air are needed to increase coverage within the canopy
Historically, the majority of airblast sprayer manufactures have not designed their spray rigs with the ability to adjust the volume of air being directed at the canopy. When designing a sprayer without this ability, engineers must over-engineer their rigs or risk trying to sell a sprayer that in some scenarios would be under-powered. Think of it as a t-shirt company either selling XS, S, M, L, and XL t-shirts, or just XL t-shirts. If the consumer doesn’t care how the t-shirt fits, then it is to the manufacture’s advantage to only produce XL t-shirts that can “fit” all consumers. This isn’t solely the fault of manufacture, as the consumer can ultimately demand a proper t-shirt size; or in this case, a sprayer able to spray XS, S, M, L, and XL canopy sizes effectively. In this article I hope to explain why we all shouldn’t all be using sprayers generating an XL amount of air, but rather choosing the proper amount of air for the size of our canopy. Right air choice for the right canopy size.
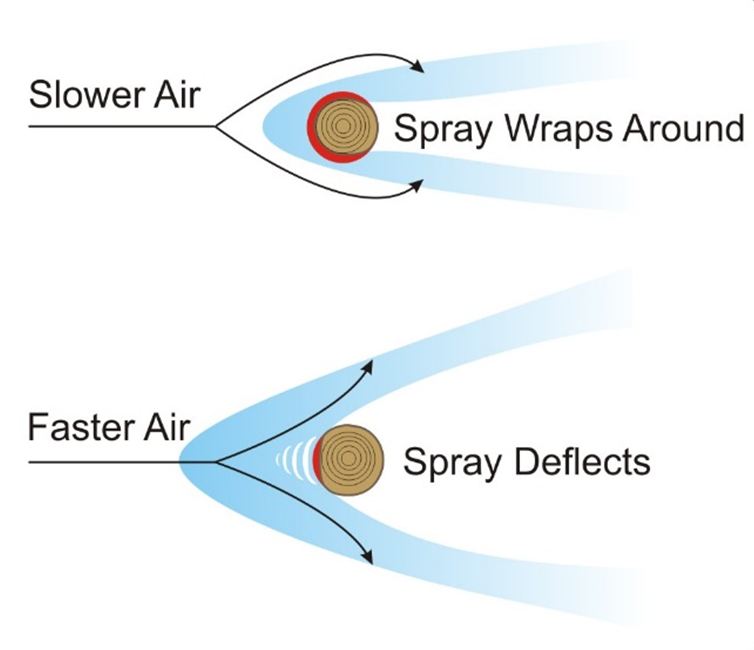
Figure 2: Barrier effect created by an excessive air speed Photo used with permission from Jason Deveau at www.sprayers101.com
Air
Air is necessary to help carry droplets of your sprayed product into the canopy, it disturbs leaves to allow the product to penetrate more effectively and uniformly, it reduces chances that wind gusts will carry the spray off-target, and it displaces the air within the canopy to allow product-laden air to enter.
Volume and Velocity of Air
Like every other growing decision, this depends on the characteristics of the specific vineyard that is being sprayed. Growth stage, environmental conditions, canopy size, trellising, purpose of the spray (e.g. mites vs mildew), variety, and row spacing should all be taken into account before you decide on an air speed.
Each one of those factors could have an article written on them, but they can be summarized into this: Does the velocity and volume of air applied travel through the canopy and emerge from the other side with force? If the answer is yes, then slowing down your air speed will greatly increase your deposition and spray effectiveness (Figure 1). This air on the other side of your row is carrying product that didn’t get deposited where you want it. Yes it could possibly make it to the next row, but chances are you are losing that valuable chemistry to your covercrop/weeds/soil or exposing yourself to an off-site drift potential.
Figure 3: Opposite side of canopy flag movement. Use flag movement to determine how much air is penetrating canopy Photo used with permission from Jason Deveau at www.sprayers101.com.Air is too fast: Increase ground speed, reduce rpm or lower fan gear.Air is too slow: Reduce ground speed, increase rpm or raise fan gear.
Additionally, while in New York we used a wind tunnel to observe how air flow responds and interacts with fruit. A high speed gust of air directed at the fruit will form a void on the sides and behind the fruit as the air rushes past (Figure 2). Think of holding your finger in the middle of a blast of water coming out of a hose; the water collides with the direct face, part of the sides and never touches the back. In this scenario with your finger being your nice Chardonnay cluster, about 50% of that cluster did not receive your fungicide. Now imagine a rock in the middle of a river. The water hits the face of the rock, but because it is slow moving, it then swirls along the sides and behind the rock to form an eddy. In this scenario that swirling water is slow moving air depositing fungicide on the sides and back of your cluster.
I know from experience that we are using excessive volumes of air in our vineyards that prevent this behind-cluster swirling because when I find mildew in treated vineyards, it is almost exclusively on the back of the cluster. Like most vineyard pests and diseases, this is a multi-faceted problem that is likely not entirely solved by modifying your air speed, but doing so can definitely help. Additionally, spraying every row compensates for some of this missed spray, but on these large canopies you can’t count on a clear path to the back of a cluster coming from the other side of the trellis; regardless of how much wind you direct into the canopy.
Figure 4: The “Cornell Doughnut” used to restrict the amount of air capable of entering the airblast sprayer. Photo from WSU’s Pest Management Transition Projectnewsletter Volume: 2 Issue: 1 April 15, 2009.
How to Know if Air is Getting Through the Canopy
Look! Have someone drive your rig down the row and look for chemical fog/air movement on the other side of the canopy by hanging flagging in the adjacent row. Flags will likely flutter, but you are looking for flags that move violently (Figure 3). Or buy water sensitive paper and set it out at varying distances from the canopy and on vertical poles at different heights. Then make a pass and look for where and how much spray is going through/over/under the canopy. The more spray hitting the paper, the less mildew your pea/vetch/grass blend covercrop will get this Spring.
Calibrating Air Output
Figure 5: Flags tied around the perimeter of the fan indicate the direction of air movement. Photo used with permission from Madeline Waring of the Ontario Ministry of Agriculture
As mentioned previously, selecting the right air speed for your needs is paramount to an efficient spray operation. However, the challenge is that most conventional sprayers are “one size fits all” with no ability to provide adjustable wind speeds to meet your needs as canopies change throughout the season or between different blocks/varieties. Again, an XL t-shirt for a variable population. A sprayer equipped with a 36” diameter fan that provides 130-MPH blasts may be the perfect output for an extremely vigorous vineyard on a large quad hoping to get coverage on the fruit; but maybe it isn’t and your slow growing VSP is still going to get that 130MPH blast. Each spray rig is going to be a little different, but there are a few ways to ultimately change the amount of air that ends up being blasted at the canopy.
- Gear up, throttle down! : Change gears and reduce your engine throttle to maintain speed but reduce your PTO rpm and the rpm of the fan; and save diesel! More info from Virginia State Cooperative Extension Publication 442-450.
- Drive faster: Yes, a PCA is telling you that you should drive faster. By increasing the tractor speed you decrease the volume of air able to penetrate the canopy. However keep in mind that you need to recalibrate your nozzles, pressure, etc. to get the same volume/acre that you need. However if you have uneven ground you may find this more difficult/uncomfortable.
- Restrict the air into the fan: Andrew Landers and his partners “developed” a rudimentary and incredibly effective device for restricting the air to your fan. It is called the “Cornell Doughnut” and is a piece of plywood cut to the diameter of your fan with a hole in the middle customized to the volume of air your current canopy needs (Figure 4). The center hole restricts the amount of air your fan can “suck” and direct to your canopy. People have taken it upon themselves to improve on Cornell’s design and I would urge you to build a better doughnut that fits your specific field.
- Change the amount of air leaving the fan: Once the air is sucked into and propelled through the fan blades it passes through a gap before blowing by the nozzles. Cornell has developed an adjustable louver that slices that air and minimizes the volume by directing it backwards. Last I heard this was patented and not available commercially, but that doesn’t mean you can’t get creative with your own design. Send me an email for more information.
- Seek alternative sprayers: Rather than purchasing a new and “improved” sprayer that is just a stainless steel version of your last one, look for something different. Support companies with engineers who want to change how we spray. Look for companies who support university research on their sprayers or do actual in-house research. Look beyond airblast sprayers to tunnel sprayers, electrostatic, directed duct sprayers, or multi-head sprayers.
Where to Direct the Spray
Having the “correct” air speed, right chemical combination, and perfect spraying conditions are all for naught if that air isn’t being directed to the right area. On basic air blast sprayers without a tower or deflectors to alter the air direction, nozzles and nozzle direction are the only way to alter your spray direction. To observe your sprayer’s wind direction, hang flagging all around the rim of the sprayer and watch the flags to see how they respond (Figure 5).
Figure 6 (left): Inherent variable air direction due to fan properties. Figure 7 (right): Undirected air leading to lost spray and increased possibility for off-site drift Photo used with permission from Jason Deveau at www.sprayers101.com.
Spinning fans do not have a uniform dispersal of air! On clockwise spinning fans generally the air of the left goes up and the air on the right goes down (Figure 6). This means that you could be missing the fruit on the row to your left and missing the top of the vine on your right. To correct this you should orient your nozzles to alter the stream of liquid spray. Once again, observations are the easiest way to diagnose an improper direction of spray. Flags, water sensitive paper, etc. can all be used again, but this time place them on top and bottom of the canopy. Make a pass with the spray on and see if you are under or over spraying (Figure 7). Then rotate your nozzles or adjust your deflectors to minimize under/overspray. I will talk more about nozzles and nozzle associated problems in my next article so stay posted.
It is important to remember that most sprayers out there do not have the ability to modify the amount of air built into the sprayer, but that doesn’t mean you can’t change it! Adjusting your air speed and direction is just as important as chemical choice and timing. Feel free to call or email if you want me to come take a look at your spray rig and help diagnose problems or just bounce some ideas off of me.
